Halloween Candy Bark
Looking for a quick and festive Halloween treat? This Halloween candy bark recipe is the perfect no-bake dessert. All you need is chocolate, leftover Halloween candy, and about 20 minutes. Kids love helping decorate, and it’s a creative way to use up all that trick-or-treat candy.
This no-bake Halloween dessert is ideal for parties, school events, or just snacking at home. Plus, it stores beautifully so you can make it ahead of time.
Every year after Halloween, my grandkids bring me some of their candy. Instead of letting it sit in the pantry, we started making Halloween candy bark together. It’s such a simple recipe that they can help with almost every step. They love scattering the candy over the warm melted chocolate and deciding which pieces should get extra sprinkles. Once it sets, I break it apart and package some for their parents and neighbors. Now it has become our little tradition, a fun way to spend time together while using up all that extra Halloween candy.
Why You’ll Love This Halloween Candy Bark
- Fast and foolproof: This recipe is as easy as melting chocolate, spreading it out, and adding toppings. There’s no baking, no special equipment, and it’s ready to eat in about 20 minutes.
- Kid-friendly: Children love helping with this recipe. They can choose which candies to add, sprinkle on decorations, and break the bark into pieces once it’s chilled.
- Zero waste: Instead of letting leftover Halloween candy sit in a bowl for weeks, this recipe puts it to good use. From mini candy bars to pretzels, almost anything works as a topping.
- Customizable: No two batches ever look the same. Use dark chocolate, white chocolate, or even orange candy melts for a spooky effect. Add sprinkles, candy corn, or chopped nuts to match your taste.
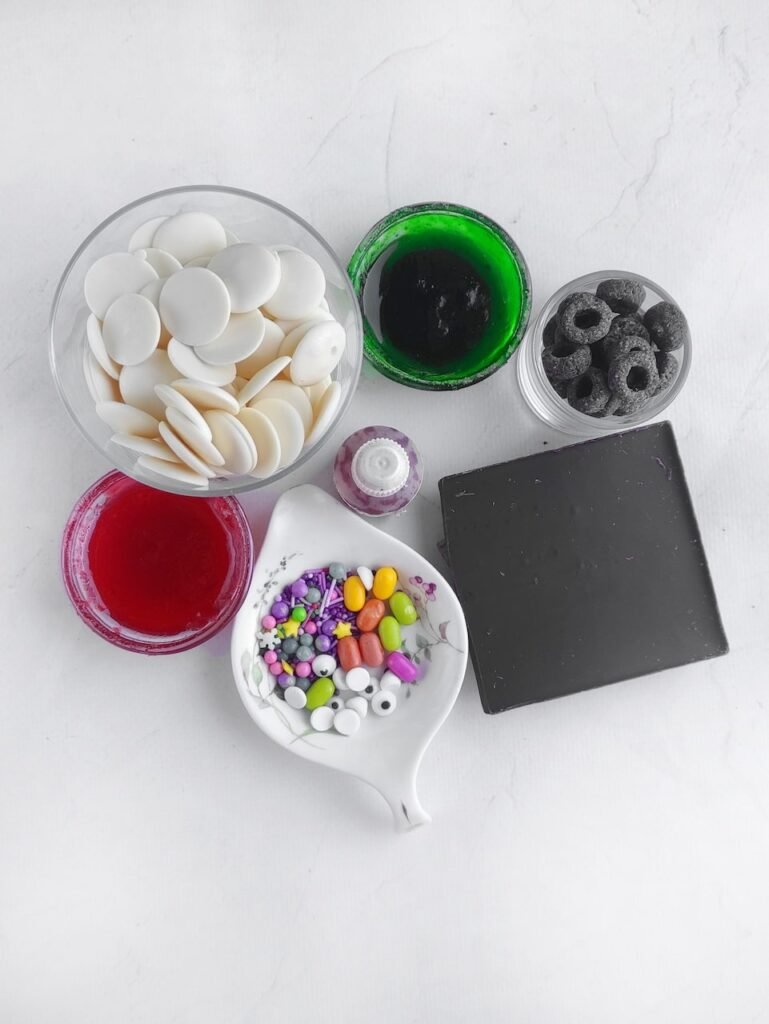
Ingredients You’ll Need
- White chocolate – the main base for your bark
- Dark chocolate rings (flakes) – for contrast and decoration
- Dark chocolate – melted or shaved, to swirl into the white chocolate
- Sugar eyes – for that spooky Halloween look
- Multicolored Tic-Tacs & sprinkles – add crunch, color, and festive fun
- Orange gel food coloring – to tint the chocolate with a Halloween vibe
- Raspberry jam – for a sweet, fruity burst
- Kiwi jam – adds a tangy, colorful layer
My favorite cooking tip
Have parchment paper or a silicone mat ready for spreading your chocolate—this makes cleanup much easier.
How to Make Halloween Candy Bark
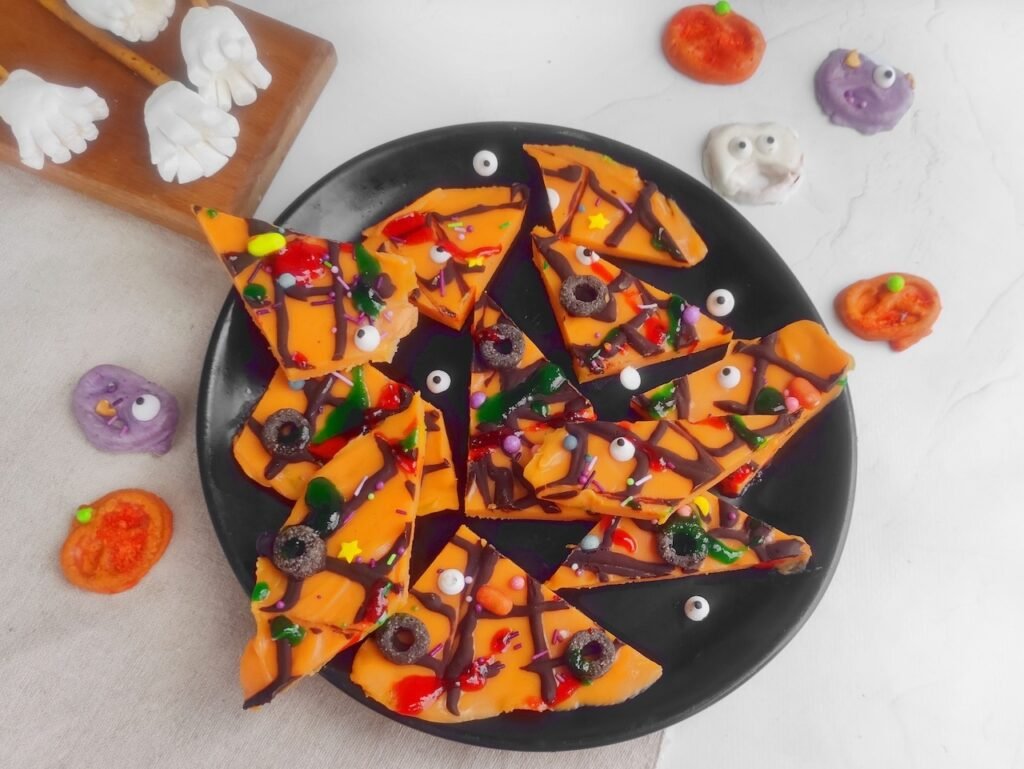
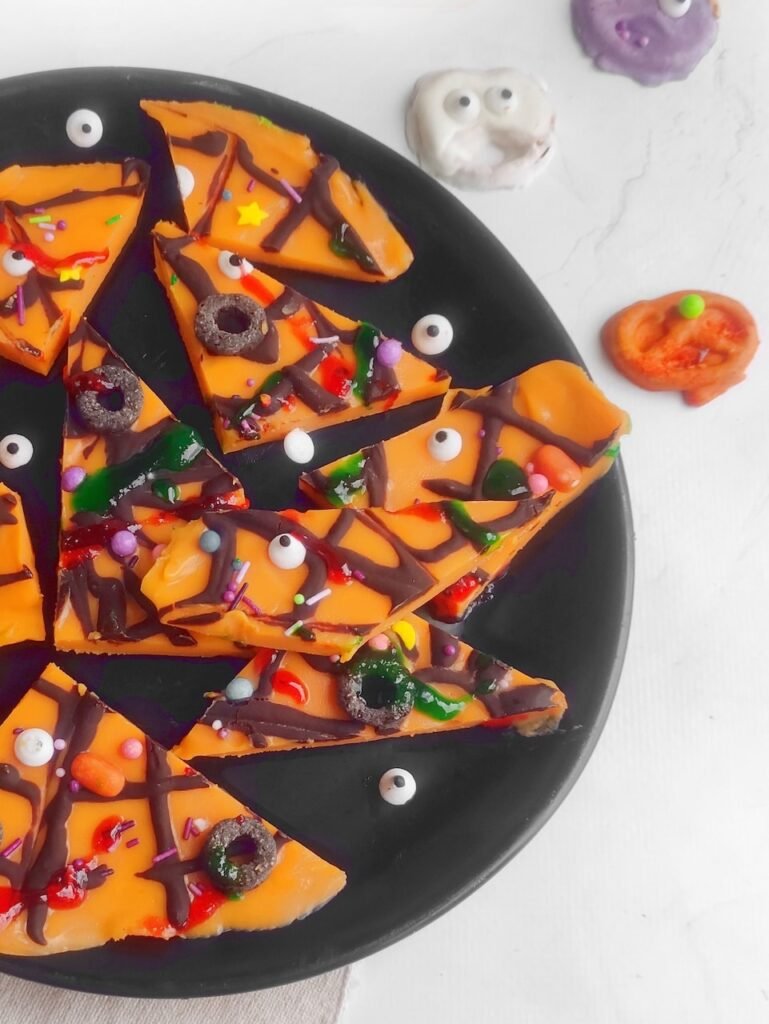
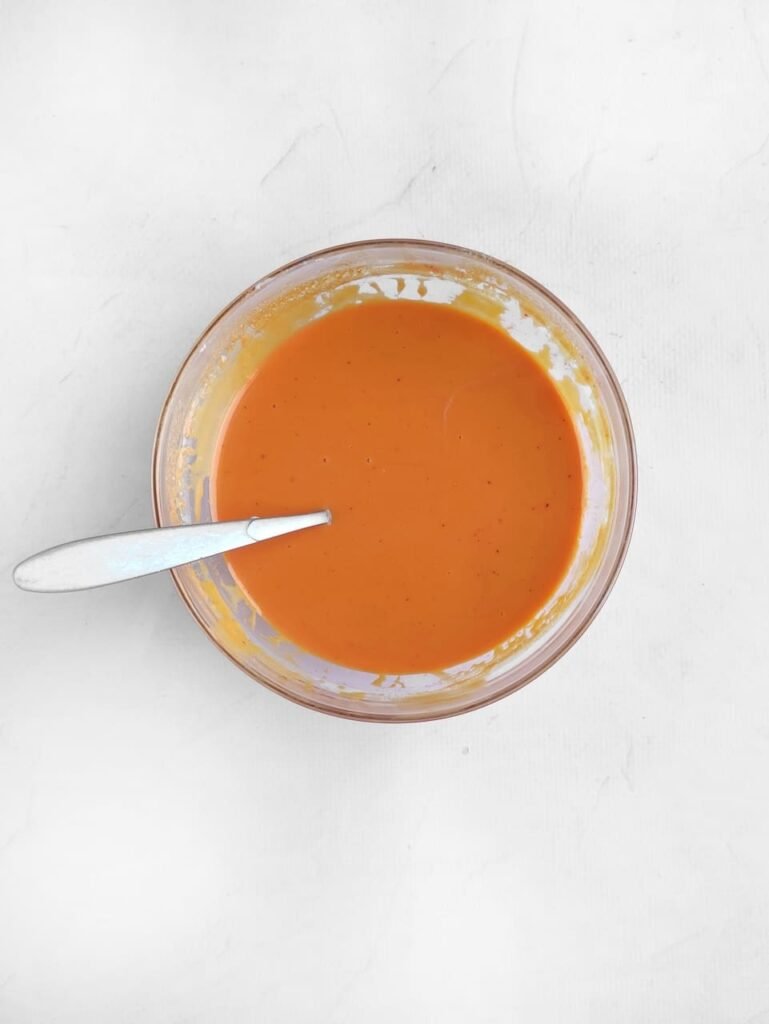
- Melt the white chocolate: Place white chocolate in a heatproof bowl. Melt gently in a water bath or microwave in 20-second bursts (pulse mode), stirring until smooth. Stir in the orange food coloring.
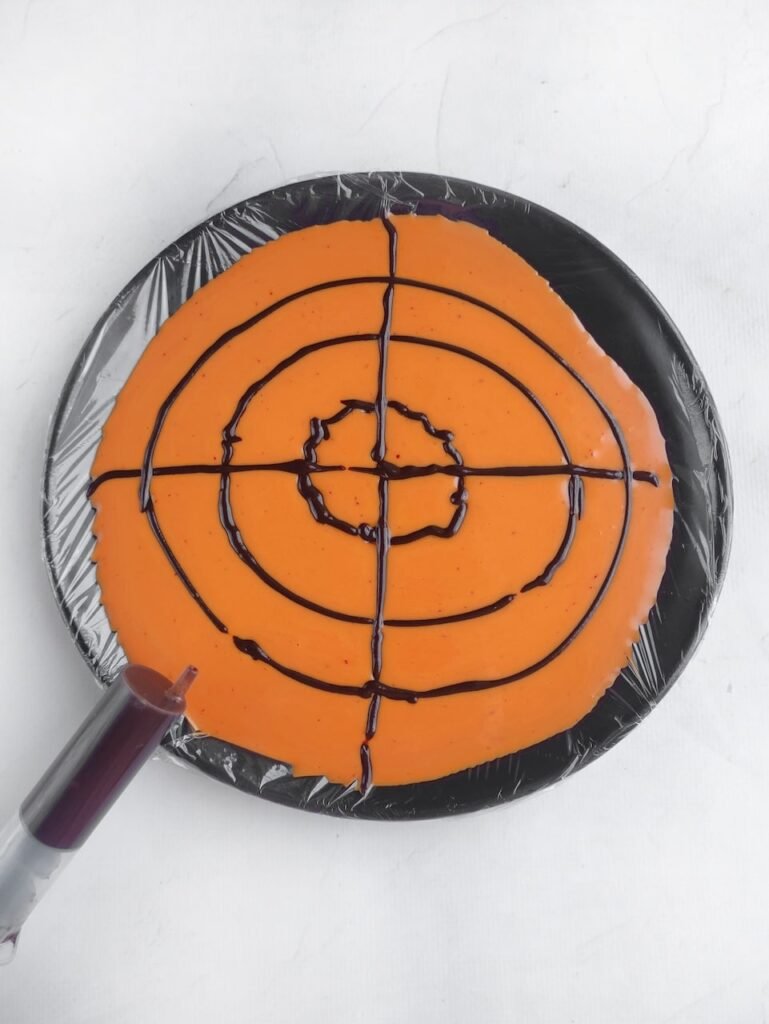
2. Prepare the base: Line a flat round plate with cling film. Pour the orange-tinted chocolate onto the plate and spread evenly with a silicone spatula.

3. Add the dark chocolate web: Melt the dark chocolate and transfer to a piping bag or syringe. Pipe circles and dividers across the orange base.
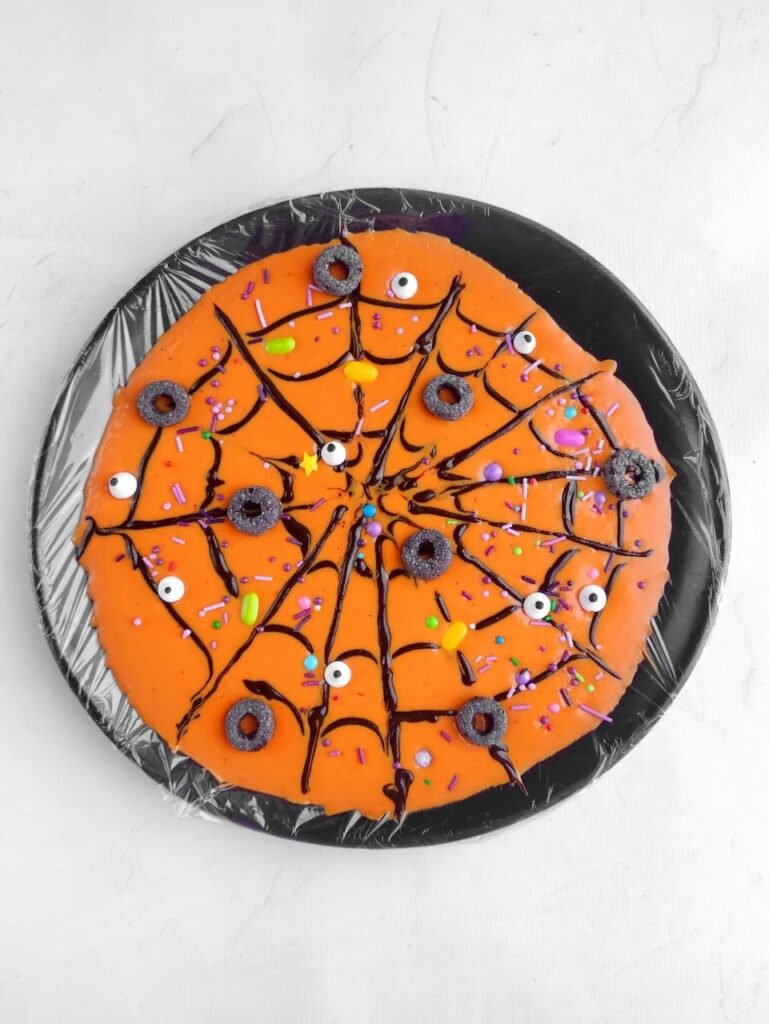
4. Make the web design: Drag a skewer from the center to the edges to form a spiderweb. Add chocolate flakes, Tic-Tacs, sprinkles, and sugar eyes while the chocolate is still soft.
5. Chill: Refrigerate for 2–3 hours until fully set.
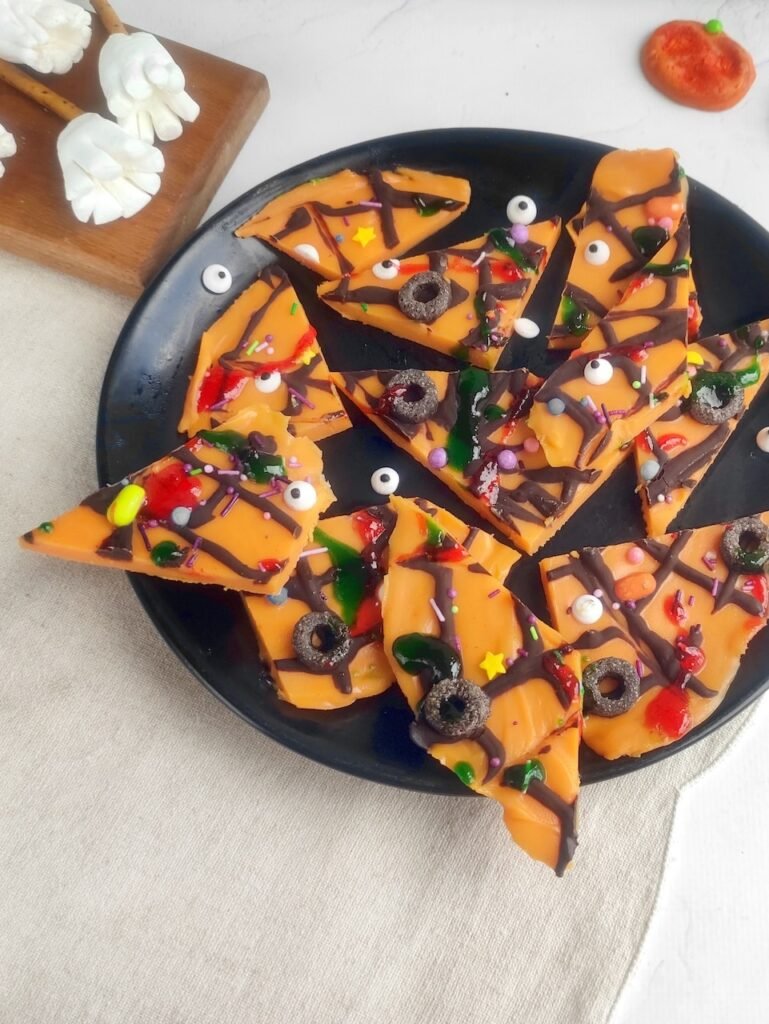
6. Add the spooky finish: Drizzle raspberry and kiwi jam drops using a spoon for a fun Halloween “drip effect.”
7. Break and serve: Peel off the cling film, break into pieces, and enjoy.

Pro Tips for Perfect Halloween Candy Bark

Fun Variations of Halloween Candy Bark
- Spooky Swirl Bark: Swirl together melted white chocolate and dark chocolate for a ghostly marble effect. Drag a skewer through the two colors to create a cobweb look, then top with candy eyes or gummy worms for a creepy finish.
- Vegan Halloween Bark: Swap in dairy-free chocolate and vegan sprinkles. Coconut flakes, pumpkin seeds, and dried cranberries also work well for extra crunch and color without dairy.
- Nutty Bark: Add almonds, cashews, or peanuts for a salty-sweet combination. Drizzle with a little peanut butter or almond butter before chilling to make it even more indulgent.
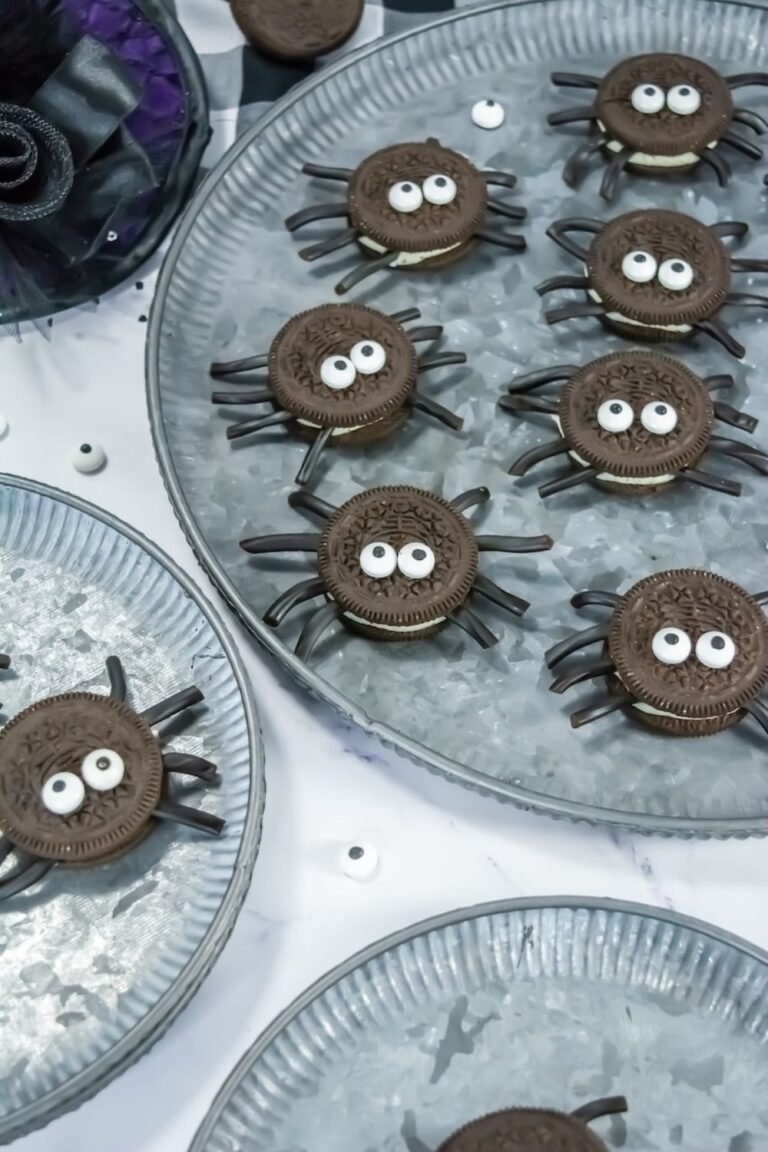
- Monster Bark: Add gummy worms, neon sprinkles, and candy eyeballs for a silly “monster mash” version kids will love. This one makes a fun Halloween party activity, too.
- Holiday Twist: Keep the method and swap the toppings for other holidays: red and green sprinkles for Christmas bark, or pastel candies for Easter bark.
Storage and Make-Ahead Tips
- Room Temperature (short-term): If your kitchen isn’t too warm, you can store Halloween candy bark at room temperature in an airtight container for up to 1 week. Keep it away from direct sunlight or heat, as the chocolate may soften or bloom (develop white streaks).
- Refrigerator (best option): For longer freshness, place your bark in an airtight container or wrap it in parchment paper and refrigerate. It will stay crisp and colorful for 2–3 weeks. This is my go-to method since grandkids usually snack on it over a couple of weeks.
- Freezer (make-ahead): Halloween candy bark freezes beautifully. Place the pieces in a freezer-safe bag or container, separating layers with parchment paper to prevent sticking. It keeps for up to 2 months. When you’re ready to serve, let it thaw at room temperature for about 15–20 minutes.
- Transporting: If you’re packing bark for a school party or giving it as a gift, keep it in a small box or treat bags with a bit of parchment inside. This helps prevent melting and keeps the toppings intact.
FAQ: Halloween Candy Bark
This Halloween candy bark recipe is quick, festive, and endlessly customizable. Whether you’re using leftover Halloween candy, making party favors, or creating a fun family activity, this bark is a must-try.
👉 If you loved this recipe, check out our other Halloween treats:
- [Spooky Spiderweb Cupcakes]
- [Pumpkin Bars with Cream Cheese Frosting]
- [No-Bake Monster Cookies]

Halloween Candy Bark (No Bake)
- Total Time: 20 minutes
- Yield: 8–10 pieces 1x
Description
This easy Halloween candy bark is a festive no-bake treat made with white chocolate, a dark chocolate spiderweb, sprinkles, sugar eyes, and a fun drizzle of raspberry and kiwi jam. Perfect for parties or using up leftover Halloween candy!
Ingredients
- 1 cup white chocolate
- 8 dark chocolate rings (flakes)
- A little dark chocolate
- 1 tsp sugar eyes
- Multicolored Tic-Tacs & sprinkles
- 2 drops orange gel food coloring
- 1 tsp raspberry jam
- 1 tsp kiwi jam
Instructions
- Place the white chocolate in a heatproof bowl. Melt it gently over a water bath or in the microwave on pulse mode for 20-second intervals, stirring between each. The texture should resemble condensed milk. Stir in the orange gel food coloring until smooth.
- Cover a flat round plate with cling film (this prevents sticking). Pour the orange-tinted chocolate onto the plate and spread it evenly with a silicone spatula.
- Melt a little dark chocolate and transfer it to a piping bag or syringe. Pipe circles and dividers across the orange base.
- Drag a skewer from the center outward to form a web pattern. While the chocolate is still soft, add dark chocolate flakes (rings), multicolored Tic-Tacs, sprinkles, and sugar eyes.
- Refrigerate the bark for 2–3 hours until fully set. Once firm, drizzle small drops of raspberry jam and kiwi jam across the top using a spoon for a spooky, “bloody” effect.
- Peel the bark from the cling film, break into rustic pieces, and serve.
Notes
- For cleaner pieces, lightly score the chocolate with a knife before chilling.
- Store in an airtight container in the refrigerator for up to 2 weeks.
- Swap the jams for strawberry or blueberry if you prefer different “spooky” colors
- Prep Time: 20 minutes
- Category: Dessert
- Cuisine: American
Nutrition
- Calories: 165 kcal
- Sugar: 20 g
- Sodium: 15 mg
- Fat: 8 g
- Saturated Fat: 5 g
- Carbohydrates: 22 g
- Fiber: <1 g
- Protein: 1 g
Nutrition information is an estimate only and will vary based on the exact candies and chocolate used.