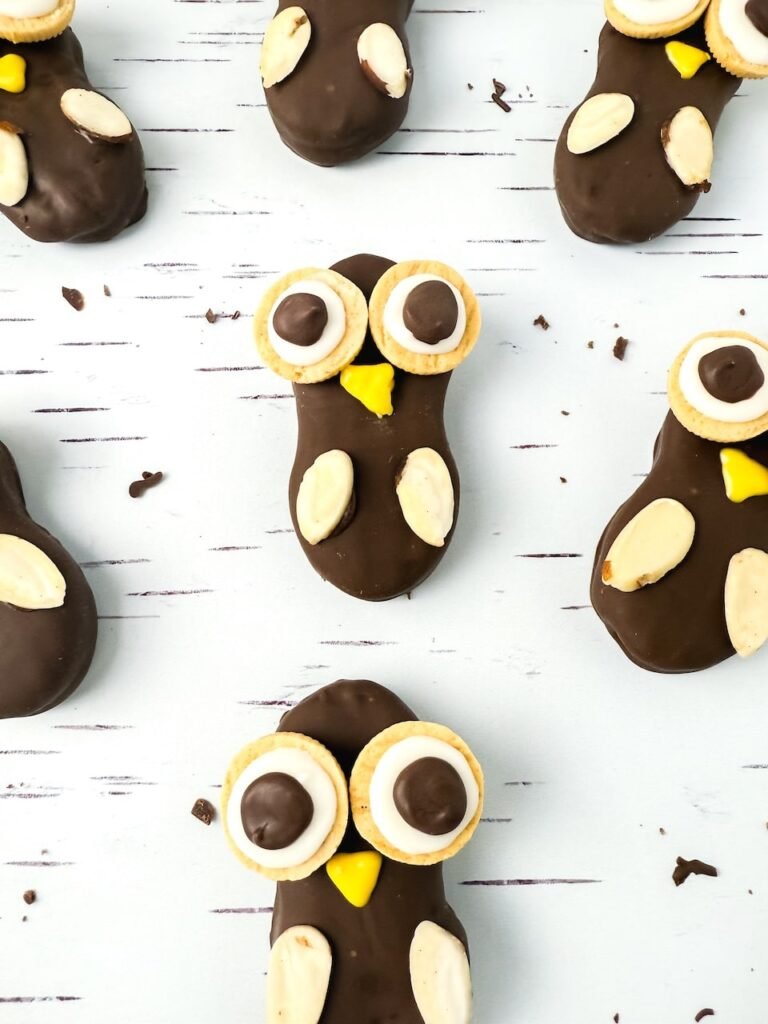
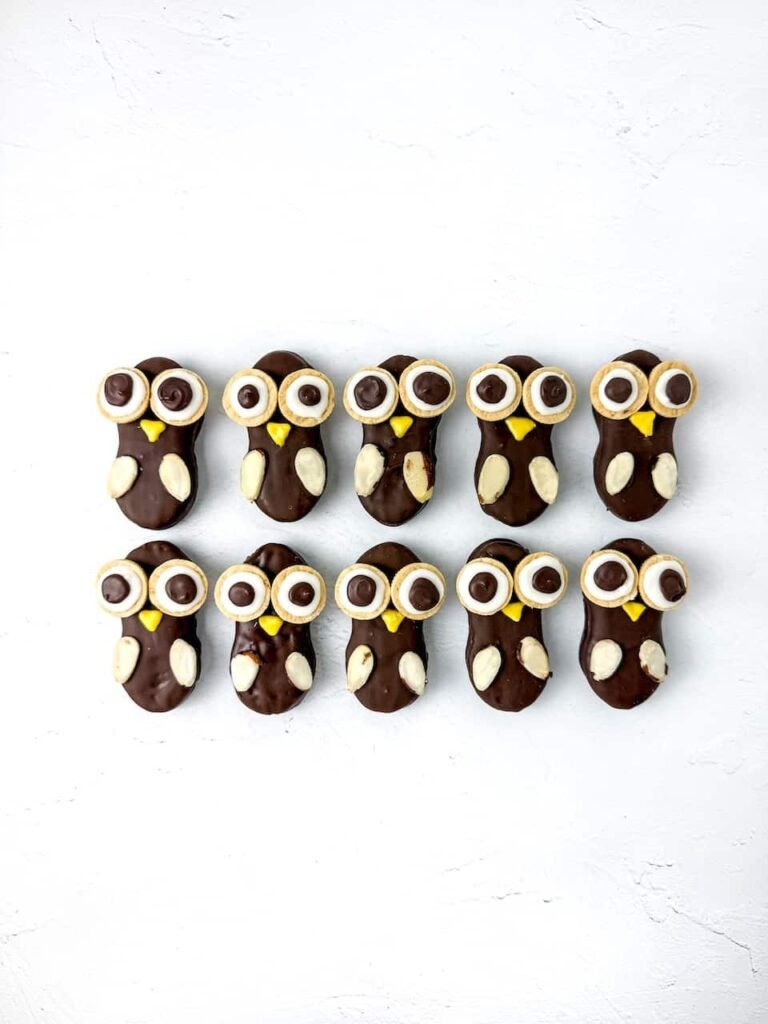
Nutter Butter Owl Cookies
I love having a few no-bake fall treats in my back pocket, and these Nutter Butter owl cookies are one I make every single year. They come together quickly with store-bought cookies and simple candy decorations, with no oven required. When the days get cooler and schedules get busy, easy recipes like this are a lifesaver.
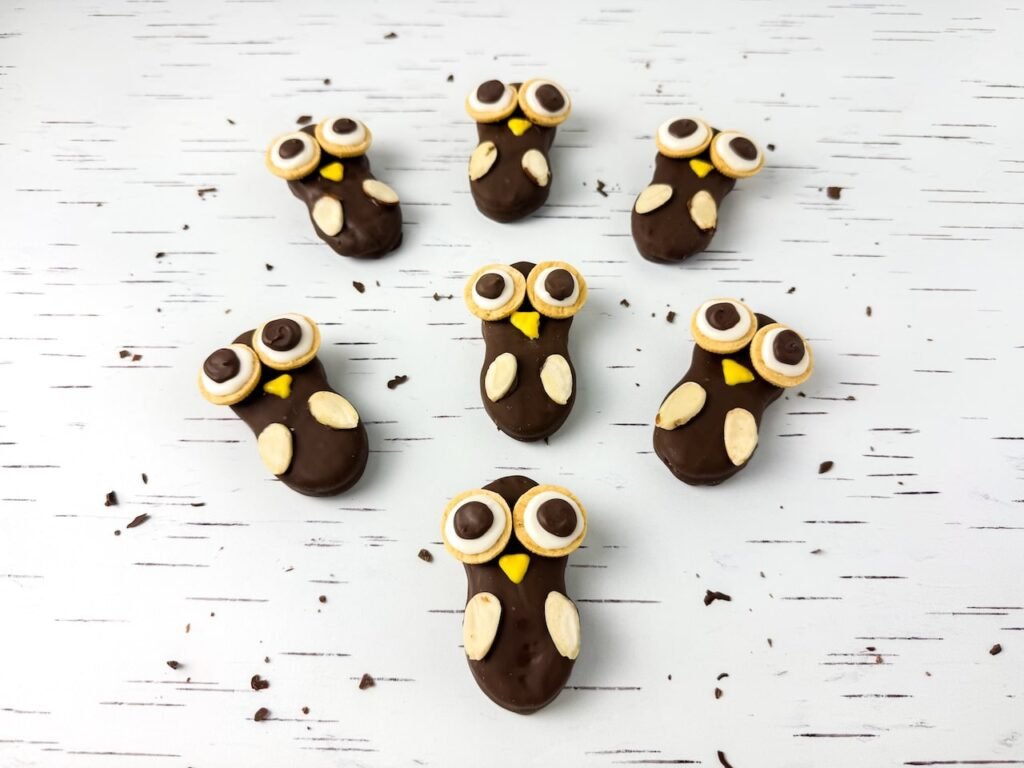
What I really enjoy is setting everything out on the counter and letting the kids decorate their own little owls. Each one ends up with its own personality, some silly, some sweet, and some surprisingly fancy. It feels more like a cozy kitchen craft than baking, which makes it perfect for fall gatherings, school events, or relaxed weekends at home.
also love how easy these owl cookies are to make ahead. They store well, travel nicely, and always bring smiles when I set them out on a dessert table. Cute, festive, and completely stress free, just the way I like my fall treats around here.
Why You’ll Love These No-Bake Owl Treats
- No baking required: Melt, dip, and decorate — done!
- Creative fun for kids: Each owl can have its own personality.
- Simple ingredients: Just cookies, candy melts, and edible eyes.
- Perfect for fall parties: Themed, adorable, and easy to transport.
Ingredients
(Scroll to the bottom of this post for the full recipe card.)
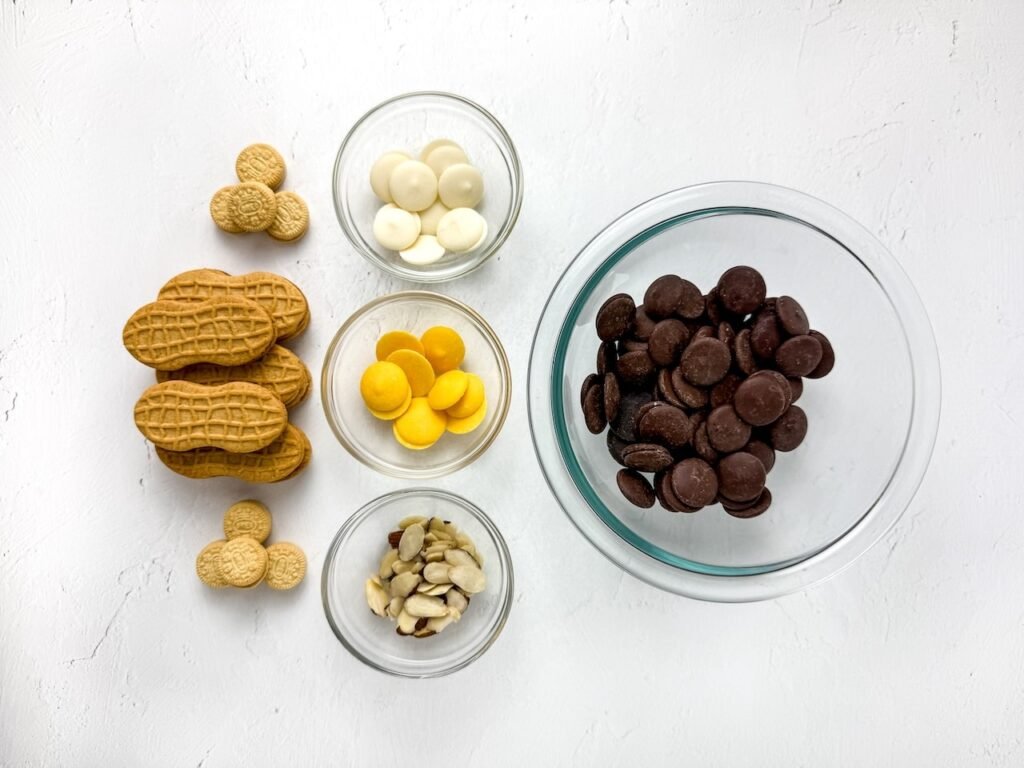
- Nutter Butter cookies
- Brown chocolate melts
- Yellow chocolate melts
- White chocolate melts
- Mini Vanilla Cookie Sandwiches
- Slivered almonds
- Optional: sprinkles, edible glitter, or small candies for accents
How to Make Nutter Butter Owl Cookies
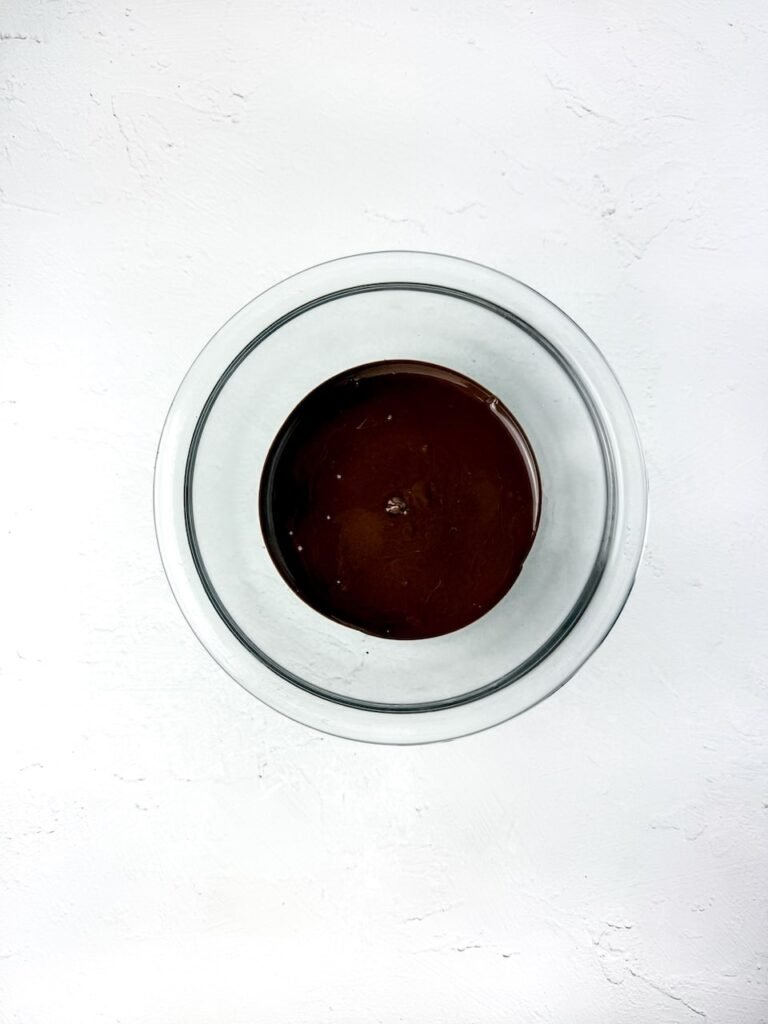
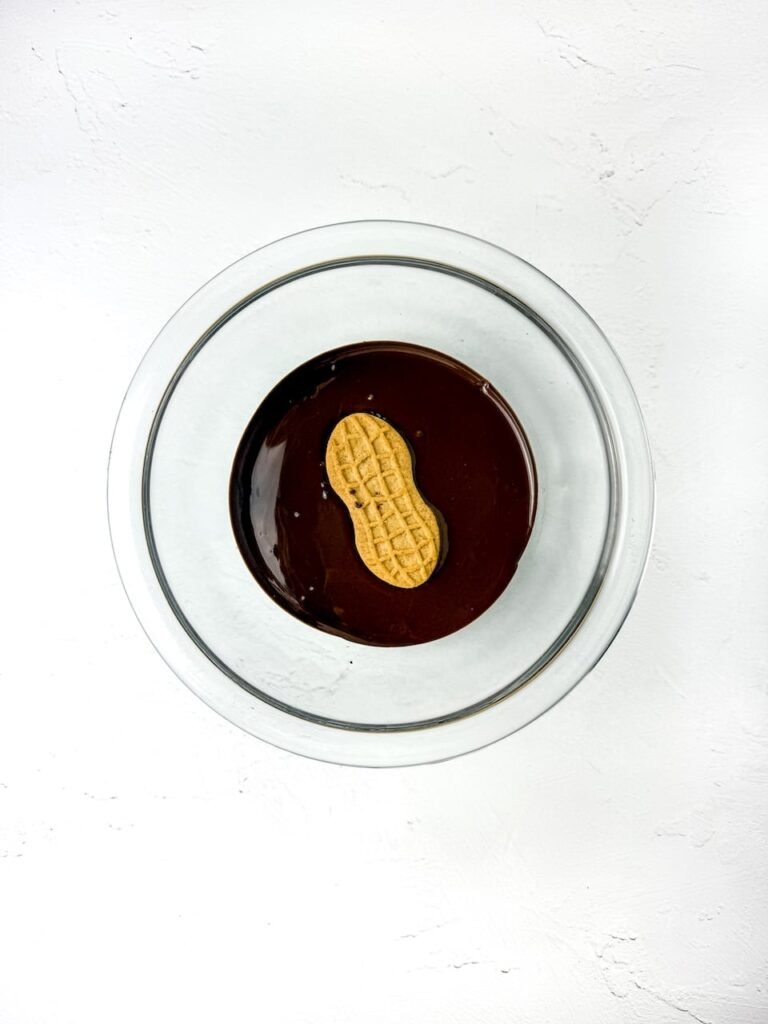
Step 1. Melt the Chocolate: Heat the brown chocolate melts in a microwave-safe bowl for 15–30 seconds at a time, stirring after each round until smooth.
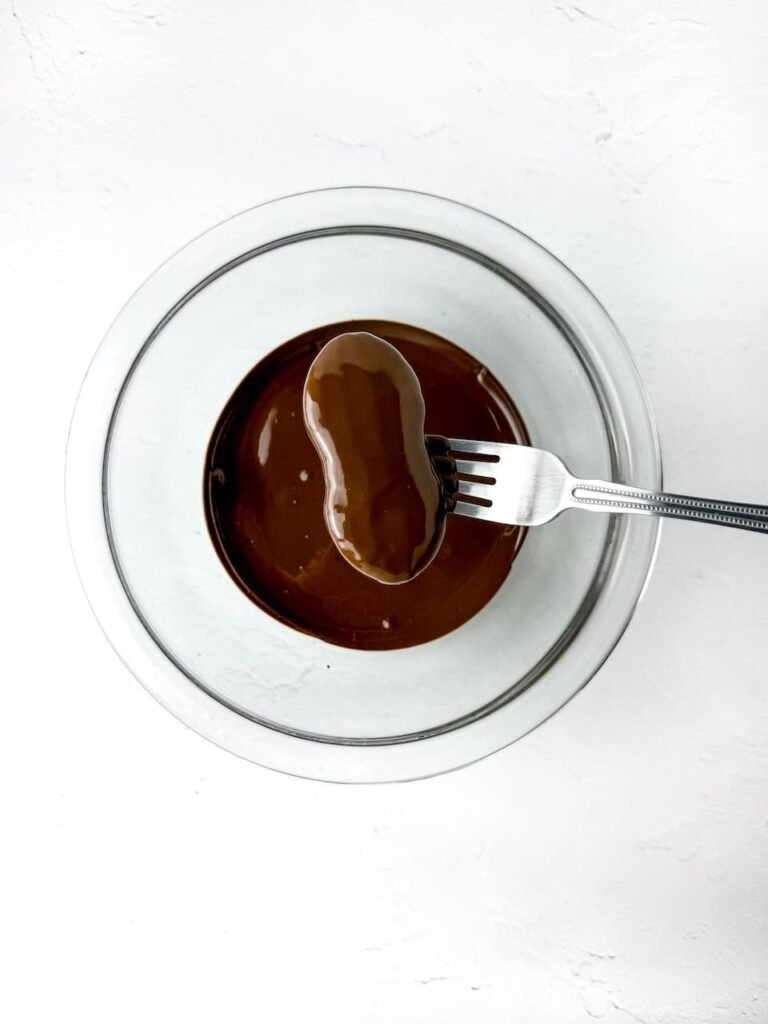
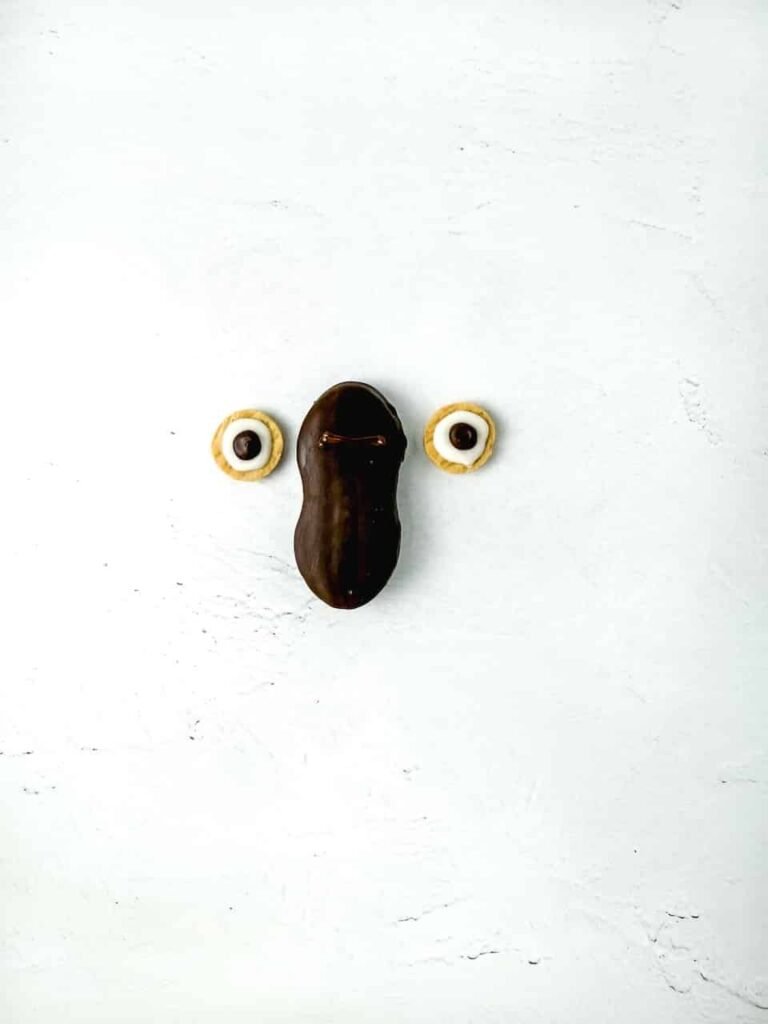
Step 2. Coat the Cookies: Dip each cookie into the melted chocolate until covered. Lift it out with a fork, scrape off the extra chocolate, and place it on parchment paper. Repeat for all cookies, then freeze for 5 minutes to harden.
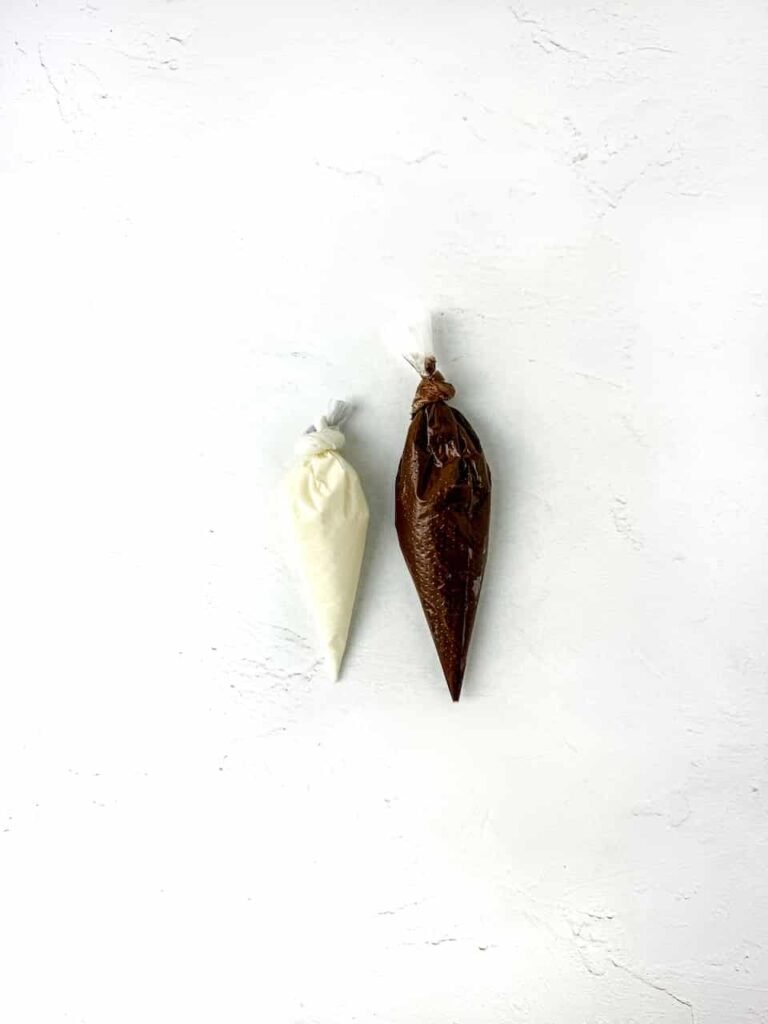
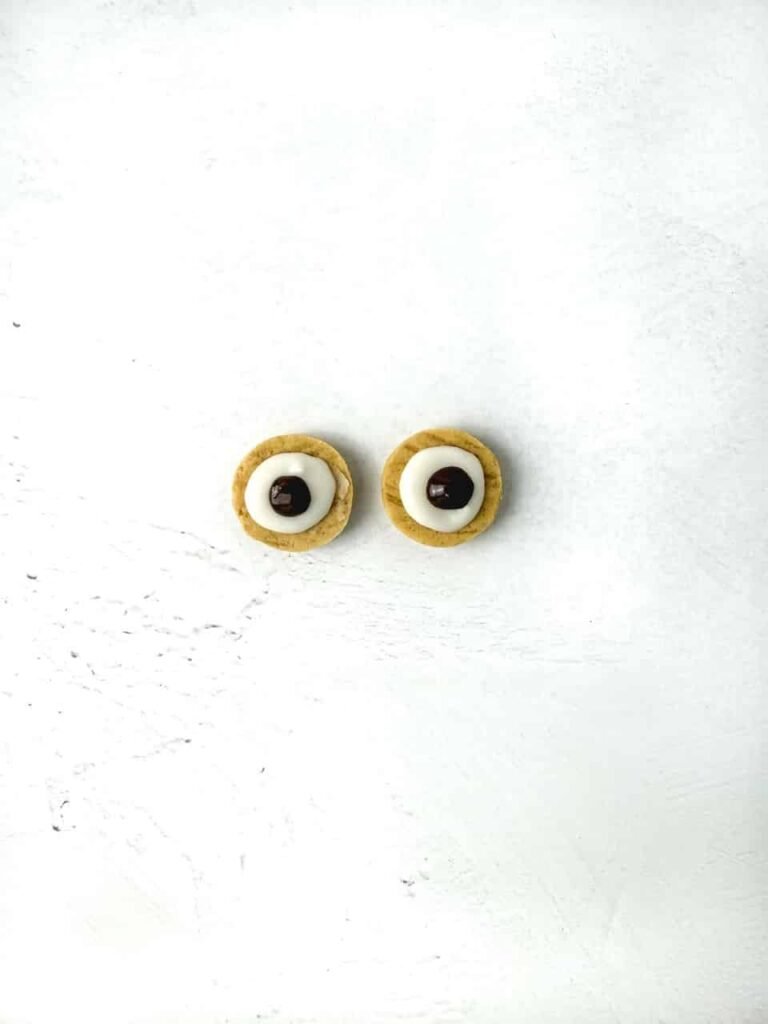
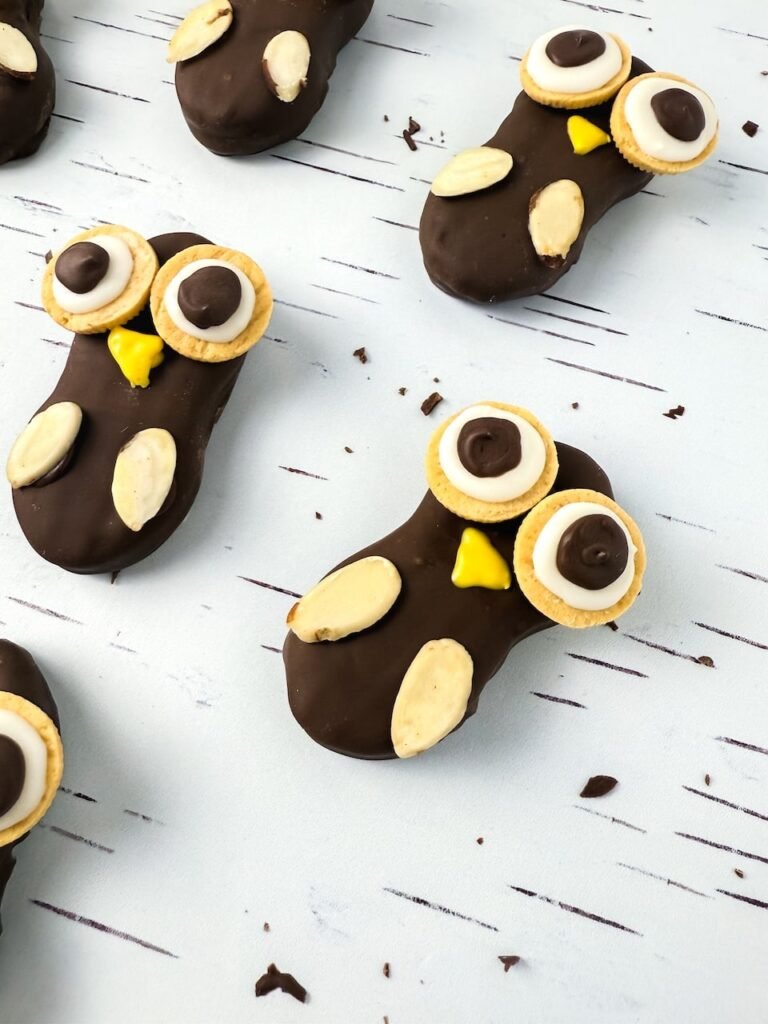
Step 3. Make the Eyes: Separate the vanilla sandwich cookies and toss the filling. Melt the white chocolate and pipe small white circles on the cookie halves. Let them dry for 3 minutes.
Melt the brown chocolate and pipe smaller brown circles in the center of the white ones. Let dry again.
Step 4. Attach the Eyes: Use a little melted brown chocolate to stick the finished eyes onto each owl cookie.
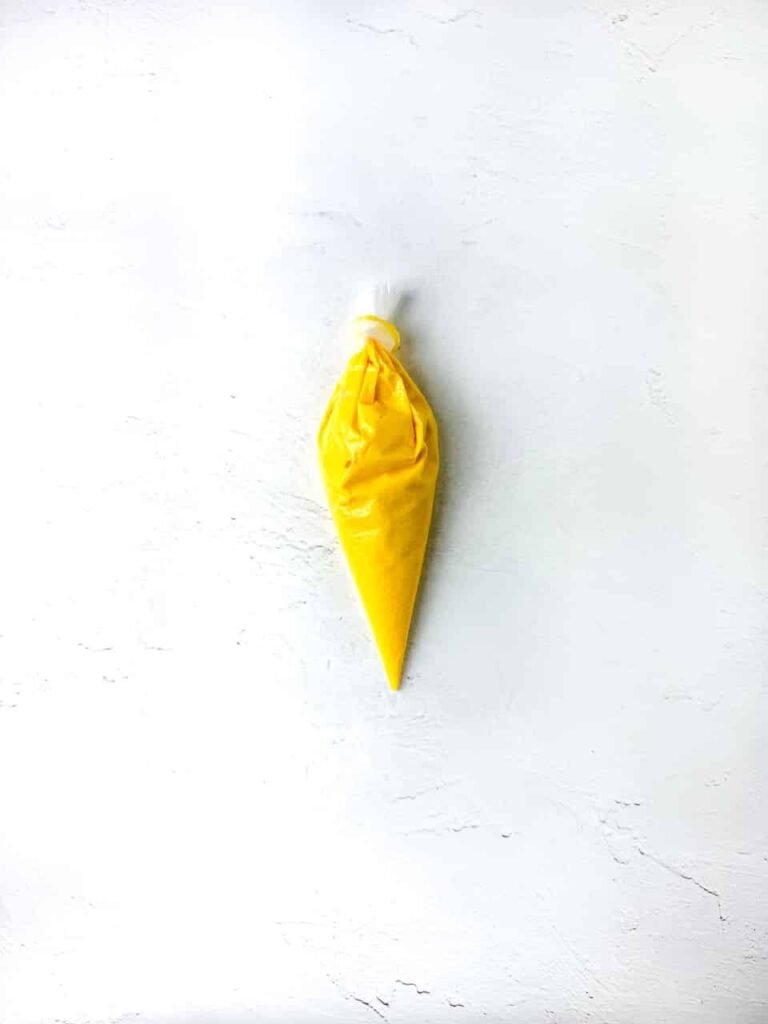
Step 5. Add Beak and Wings: Melt the yellow chocolate and pipe a small triangle under the eyes for the beak. Then pipe small dots on each side and press sliced almonds on top for wings.
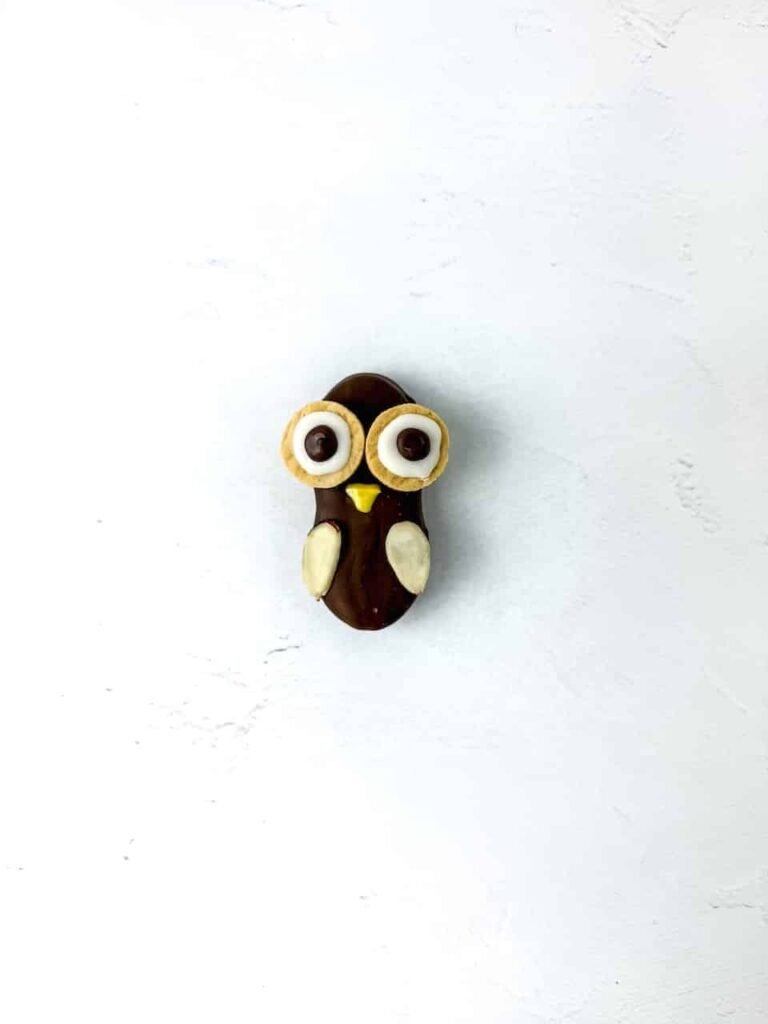
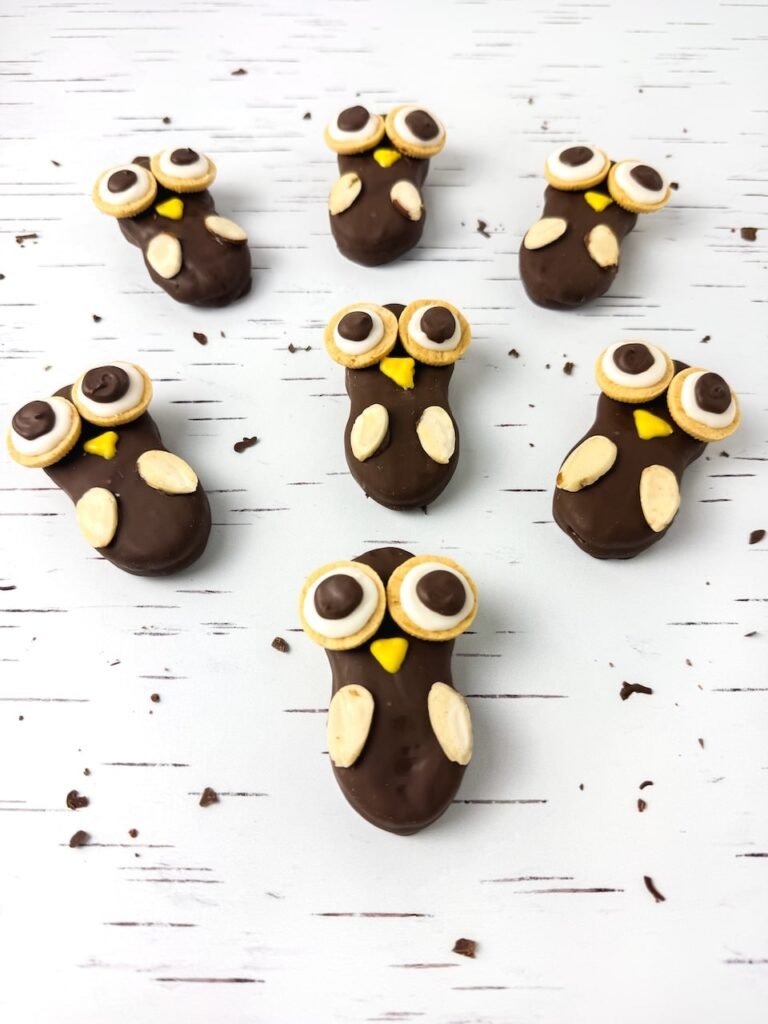
Step 6. Let Set and Serve: Allow the decorated Nutter Butter owls to sit for about 3 minutes to dry completely. Once set, they’re ready to serve and enjoy!
Tips for Perfect Nutter Butter Owl Cookies
Make-Ahead and Storage Instructions
- Make these Nutter Butter Owl Cookies up to 2 days ahead of your party or holiday gathering to save time on the day of your event.
- Allow the chocolate to fully harden before storing the cookies to keep the owl decorations intact.
- Store the cookies in an airtight container at room temperature for up to 5 days.
- Place the cookies in a single layer whenever possible to prevent the eyes and almond wings from breaking.
- If you need to stack the cookies, place parchment paper between each layer for extra protection.
If you like creative fall desserts, check out my acorn donut holes, nutter butter acorns, and scarecrow pretzel rods for more fun ideas.
Print
Nutter Butter Owl Cookies
These Nutter Butter owl cookies are an easy no-bake fall treat made with chocolate-covered Nutter Butters, mini vanilla cookie eyes, yellow chocolate beaks, and sliced almond wings. Perfect for Thanksgiving, classroom parties, and woodland-themed celebrations.
- Total Time35 minutes
- Yield10 1x
- DietVegetarian
Ingredients
- 10 Nutter Butters
- 6 ounces brown chocolate melts
- 1 ounce yellow chocolate melts
- 1 ounce white chocolate melts
- Mini vanilla cookie sandwiches
- Sliced almonds
Instructions
- Melt the brown chocolate melts in a microwave-safe bowl in 15- to 30-second increments, stirring between each one, until smooth.
- Dip one Nutter Butter at a time into the melted chocolate until fully coated. Lift with a fork and scrape off the excess chocolate on the edge of the bowl.
- Place the coated cookies on parchment paper. Freeze for 5 minutes to harden.
- Transfer the remaining brown chocolate to a piping bag and set aside.
- Separate the mini vanilla cookie sandwiches and remove the cream filling.
- Melt the white chocolate melts, transfer to a piping bag, and cut a small hole in the tip.
- Pipe a white chocolate circle on the flat side of each cookie half to create the eyes. Let dry for 3 minutes.
- Pipe a small brown chocolate circle on top of each white circle to create the pupils. Reheat the brown chocolate in the piping bag for 30 seconds if needed.
- Use brown chocolate to attach two eyes to each coated Nutter Butter.
- Melt the yellow chocolate melts and transfer to a piping bag. Pipe a small triangle below the eyes for the beak.
- Pipe a dot of yellow or brown chocolate on each side of the Nutter Butter and attach sliced almonds for wings.
- Let the owl cookies sit for 3 minutes to set, then serve and enjoy.
Notes
- Use short microwave intervals to keep the chocolate smooth and prevent burning.
- Let each chocolate layer set before adding the next detail.
- Place parchment paper between layers if stacking.
Nutrition
- Serving Size: 1
- Calories: 224 kcal
- Sugar: 17.2 g
- Sodium: 91 mg
- Fat: 12.4 g
- Carbohydrates: 26.2 g
- Protein: 3.5 g

Such a fun little dessert! I used Halloween-colored M&M’s to match our party theme, and they still looked like owls.
Thank you for the 5 stars! I appreciate you taking the time to leave a review.
I do wish they had nutter butters in England! These look like so much fun to make and eat.
I wish you had Nutter Butters in England too — they’re such a fun little cookie.
Thank you for this idea! I needed a quick fall-themed treat for a school party and these worked perfectly.
I’m so glad to hear that! I’m happy they worked out for you.
I wasn’t sure mine would turn out as cute as yours, but they really did. Your instructions made it easy, thank you!
Aw, I’m so glad to hear that! These little treats always look more complicated than they are. I’m happy the instructions made it easy for you!
I’m always looking for treats that are cute but not complicated, and these were exactly that. Saving this for Thanksgiving week too!
Thank you so much! I’m glad you enjoyed them — I love cute little treats that don’t take all day too.
These were a hit with my daughter’s Girl Scout troop! I loved that the steps were simple enough for the girls to do on their own.
Oh, I just love hearing that! I’m so glad the girls enjoyed making them 😀
Now this is the type of baking I can get involved with! They look so darn cute! Absolutely adorable. I love how easy they are to put together too! I’m wondering if I could do some sort of reindeer adaptation of these in the run up to Christmas. Thanks for the inspiration! These are fab!
Claire
http://www.clairemac.co.uk
A reindeer version would be adorable….I think you could definitely adapt these for Christmas.