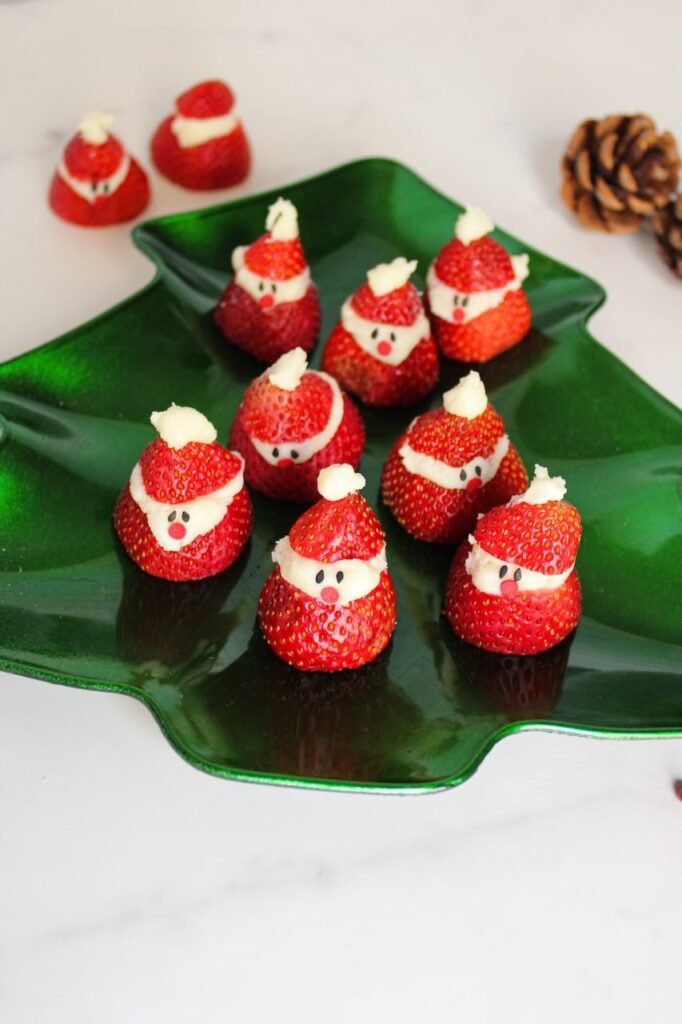
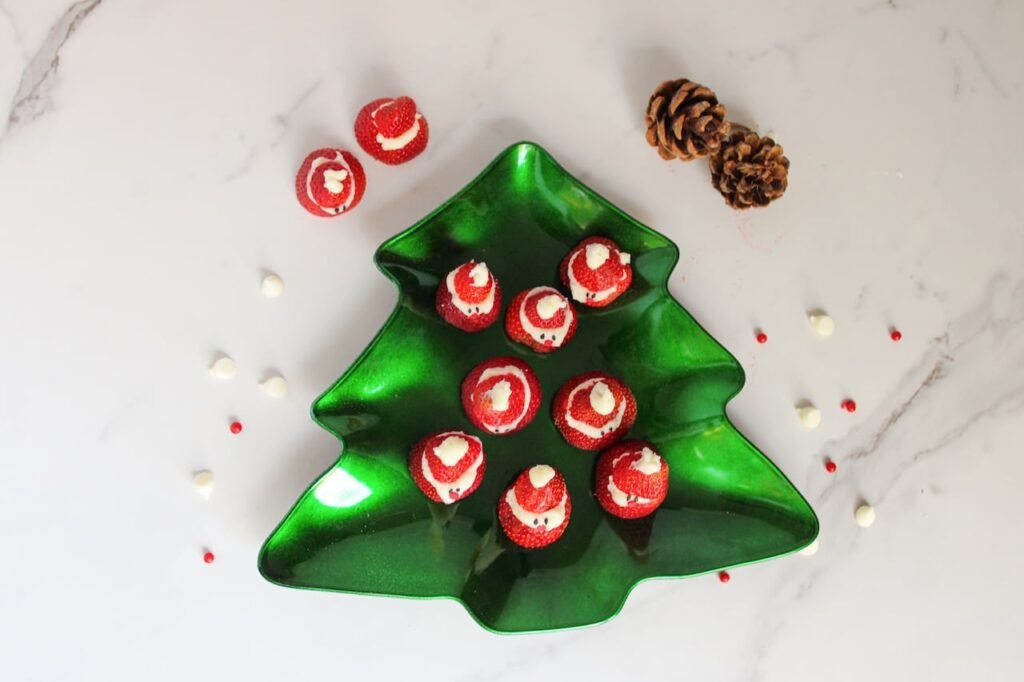
Strawberry Santas Christmas Dessert
There is something magical about the holidays when the kitchen fills with bright colors and little hands eager to help, and that is how our tradition of making Strawberry Santas first began.
My niece was three years old and obsessed with anything red and sweet. I wanted something festive we could make together with no oven and no fuss, just simple and joyful fun. I grabbed some strawberries, cream cheese, and chocolate chips, and our holiday ritual was born.
Now, years later, it is still one of the first treats we make every December. Watching those little berry Santas come to life never gets old.
These no-bake Strawberry Santas are a quick 15-minute holiday treat made with fresh berries and a creamy white chocolate filling. They are fun for kids, festive for parties, and easy enough for any busy December day.
Strawberry Santas Recipe Snapshot
- 🍓 Skill Level: Easy
- ❄️ Uses: Fresh strawberries and a no-bake filling (no oven required)
- ⏱️ Prep Time: 15 minutes
- 🔥 Cook Time: None
- ⏳ Total Time: About 15 minutes
- 👨👩👧👦 Servings: 10–15 Strawberry Santas
- 😋 Tastes Like: Fresh berries with creamy, lightly sweet filling
- 🎄 Great For: Holiday platters, kids’ snacks, classroom parties, or a festive no-bake activity
Why We Love Strawberry Santas
- No-bake holiday magic — fresh berries + fluffy filling = instant Christmas cheer with zero oven time.
- Kid-friendly fun — little hands can help assemble, decorate, and taste-test along the way.
- Light but festive — perfect when you want a healthy holiday snack between all the cookies.
- Easy to customize — classic cream cheese, coconut-whipped, vegan, or yogurt-filled… everyone gets a version they love.
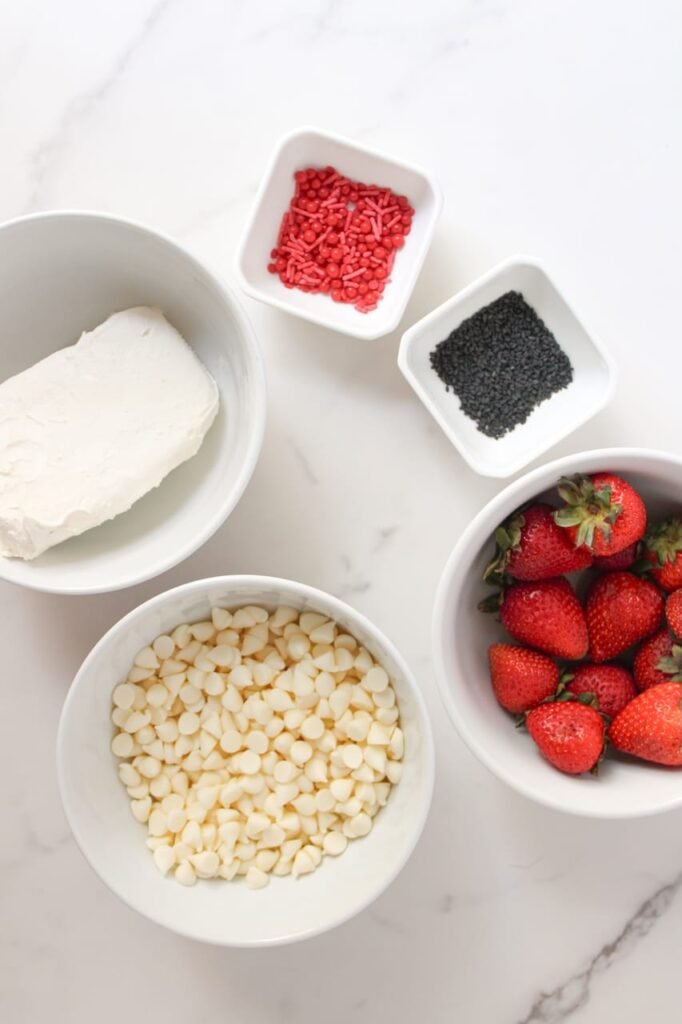
Ingredients You’ll Need
- 10–15 large strawberries — look for ones with flat-ish bottoms so they stand like little Santas.
- ½ cup melted white chocolate chips — for the filling and the “pom-pom” details.
- ¼ cup cream cheese — gives the filling just enough body to hold its shape.
- Black sesame seeds or black sprinkles — tiny, perfect eyes.
- Red round sprinkles or red icing — for Santa’s nose.
Substitutions
- Cream cheese: Neufchâtel or reduced-fat cream cheese works the same way.
- Dairy-Free Option: Use dairy-free white chocolate chips and dairy-free cream cheese for a fully dairy-free filling.
- Vegan Option: Choose vegan white chocolate and vegan cream cheese, and confirm decorations (sprinkles) are gelatin-free.
- Lower-Sugar Option: Swap in reduced-sugar or sugar-free white chocolate and keep the decorations minimal.
Equipment You’ll Need
- Sharp paring knife
- Cutting board
- Piping bag (or zip-top bag with the corner snipped)
- Small plate or tray (chilled, if possible)
- Tweezers or toothpick (for placing the eyes)
- Small bowl for melting chocolate
How to Make Strawberry Santas Step-by-Step
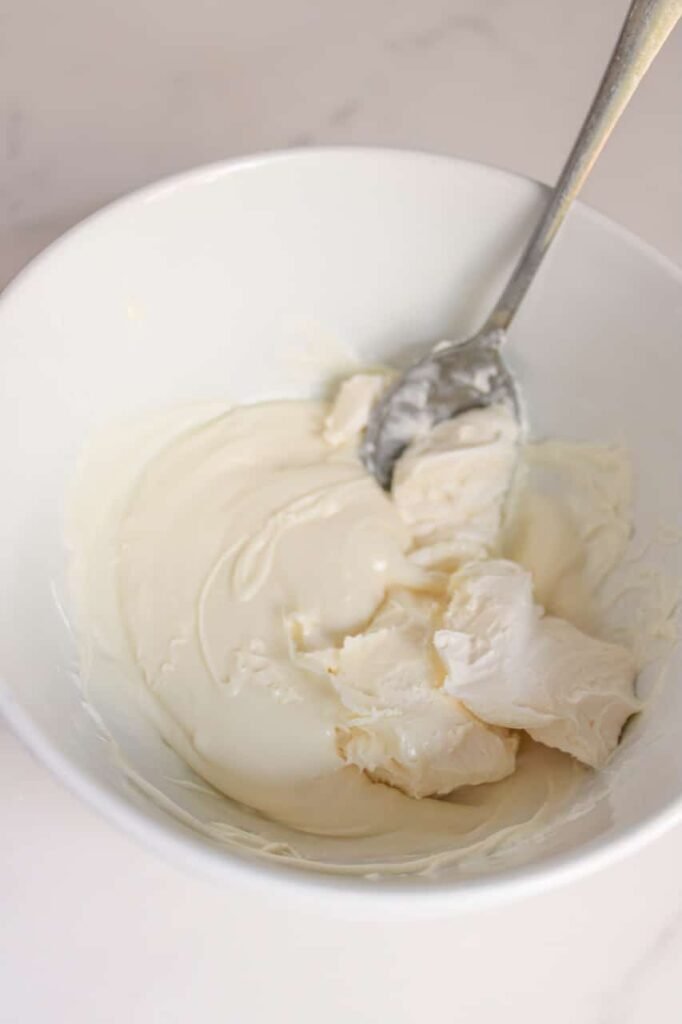
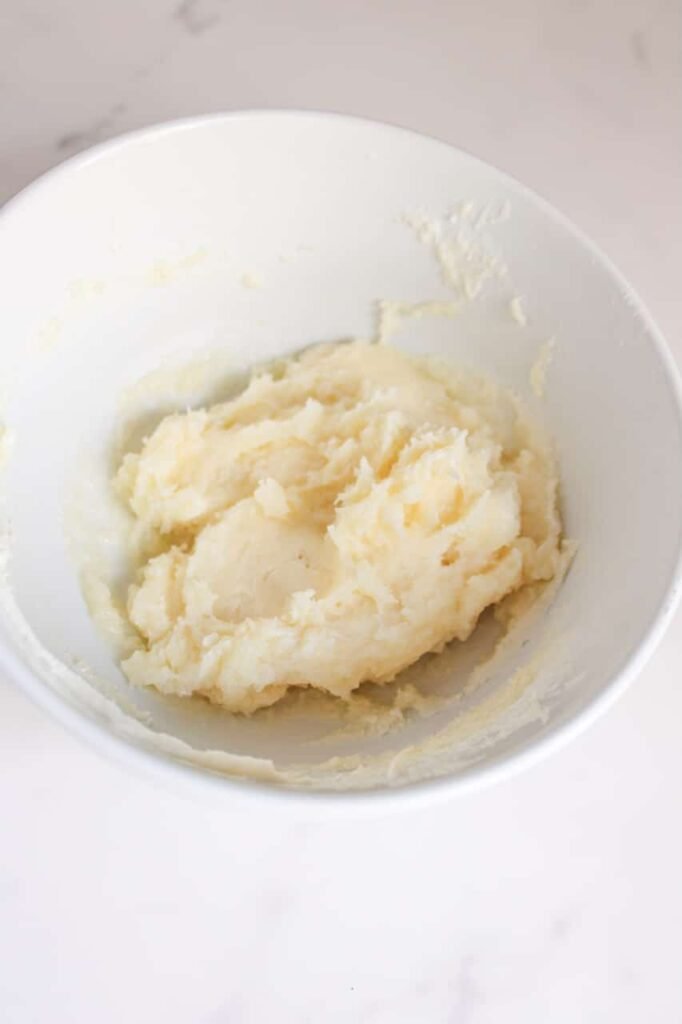
Step 1: Melt the white chocolate chips according to the instructions on the package. Make sure they are fully melted and smooth, then measure out ½ cup of the melted chocolate so the mixture stays balanced.
Step 2: Add the ¼ cup of cream cheese directly into the warm melted chocolate and whisk until the two come together in a smooth, creamy mixture with no lumps. Take a moment to make sure everything is fully blended so it pipes easily.
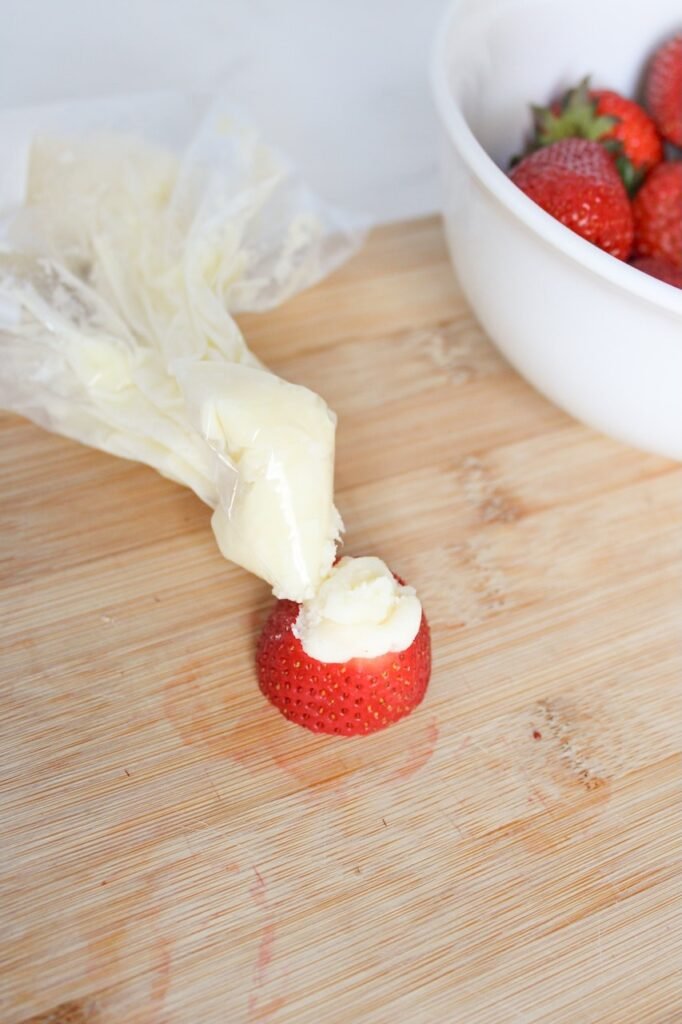
Step 3: Transfer the mixture into a piping bag. Push the mixture down toward the tip and twist the top of the bag so you have steady pressure and better control when piping.
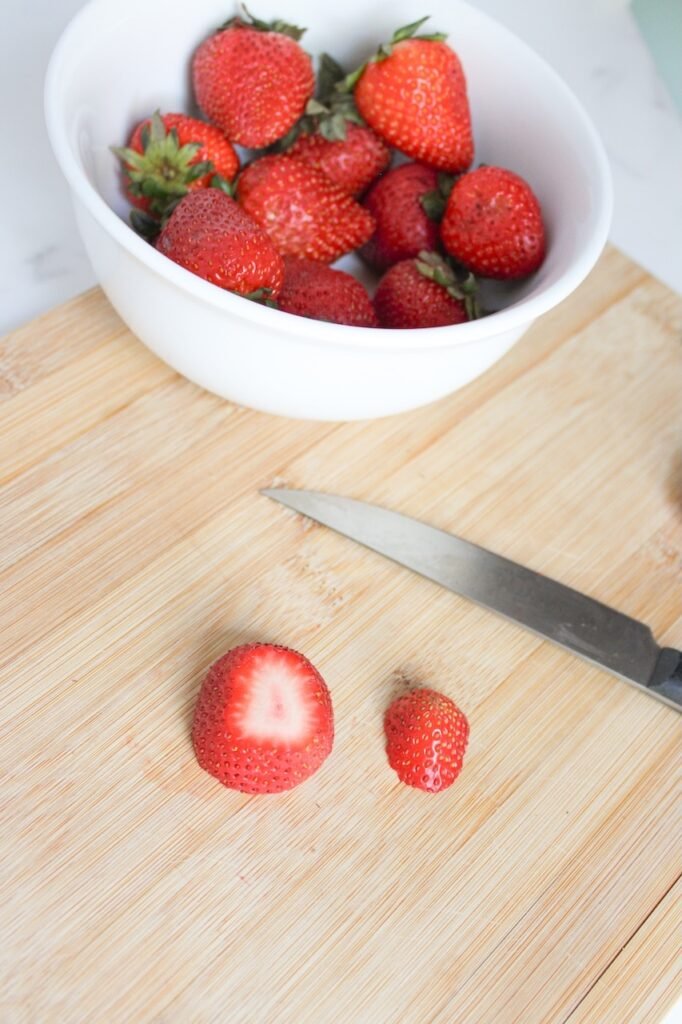
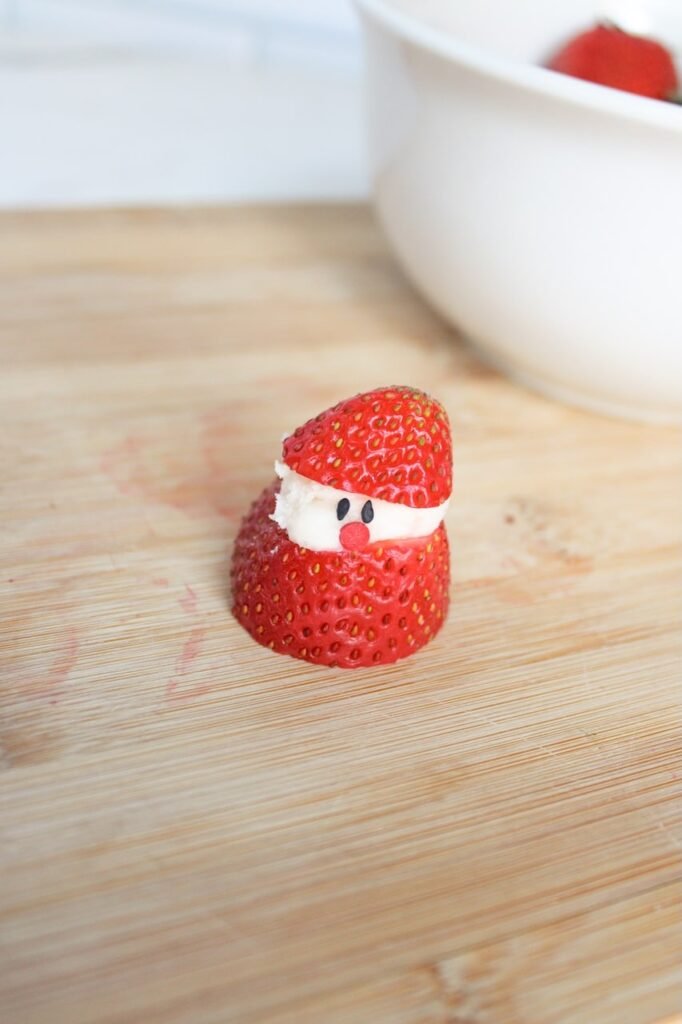
Step 4: Prepare the strawberries by slicing off the stem end so each berry sits flat on a plate. After removing the bottom, cut each strawberry across the middle to create a bottom “body” piece and a top “hat” piece.
Step 5: Lift off the top half of each strawberry and pipe a generous amount of the frosting mixture onto the lower half. The filling should be thick enough to hold its shape and visible around the edges once you add the top back on.
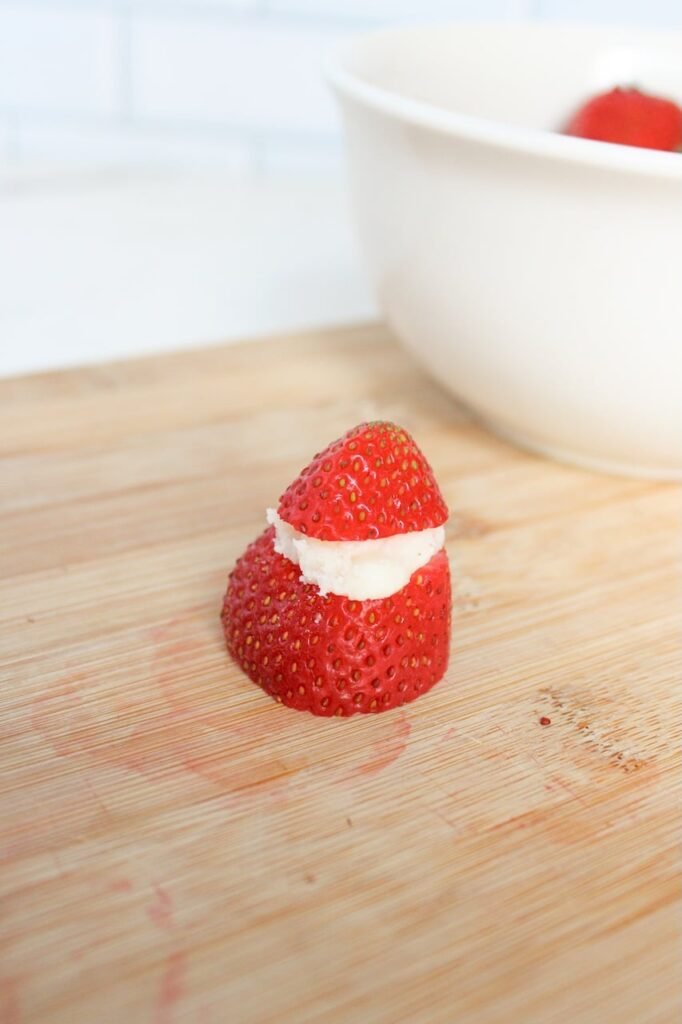
Step 6: Place the top portion of the strawberry back on to form the Santa “hat.” Pipe a small dot of the mixture on the very top of the berry to finish the look and give the hat its little pom-pom.
Tips for Making Perfect Strawberry Santas

Variations
- Extra-festive look: Add a light dusting of powdered sugar around the Santas just before serving to create a “snowy” effect on the platter.
- Bigger Santas: Use extra-large strawberries and pipe a fuller swirl of filling to make oversized, centerpiece-style Santas for a dessert board.
- Mini Santas: Choose small berries and use tiny dots of filling to create bite-size Santas perfect for kids’ party trays.
- Chocolate-dipped base: Dip just the bottom slice of each strawberry in melted chocolate and let it set for a firmer, sturdier base.
- Colored hats: Use red gel icing to create brighter hat details or to outline the edges for a more cartoon-style look.
- Sprinkle accents: Add festive sprinkles around the “hat” for a playful touch — great for kids helping in the kitchen.
Storage
- These are best enjoyed the day they’re made, since strawberries release moisture as they sit.
- If you need to store them, place the Santas in a single layer on a parchment-lined tray so they don’t tip or stick together.
- Cover the tray loosely with plastic wrap or a lid that doesn’t press down on the tops.
- Refrigerate for up to 12 hours. Beyond that, the berries may soften and the filling can lose its shape.
- Avoid freezing; the strawberries become watery once thawed and won’t hold the structure of the filling.
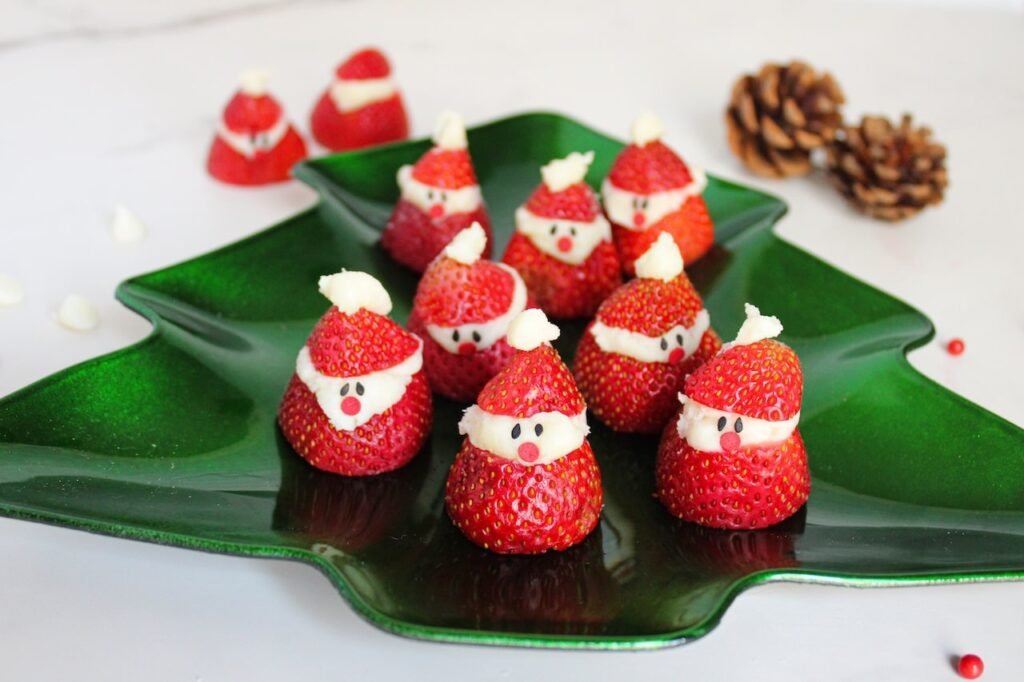
Serving Suggestions & Party Tips
Holiday Platter Ideas
- Use a white or light platter to make the red berries pop.
- Dust lightly with powdered sugar for a snowy effect.
- Add a few mint or rosemary sprigs for simple holiday greenery.
What to Serve Them With
- Hot cocoa, Christmas cookies, brownies, or peppermint bark.
- Fresh fruit trays, waffles, or pancakes for a holiday brunch spread.
Scaling for a Crowd
- Plan for 1–2 Santas per person.
- Prep all cut strawberries first, then pipe assembly-line style.
- Transport on a parchment-lined tray and keep chilled until serving.

Strawberry Santas (Easy No-Bake Christmas Treat)
These adorable strawberry Santas are a quick, no-bake holiday treat made with fresh strawberries, a simple white-chocolate cream cheese filling, and cute sprinkle decorations. They come together in minutes, look festive on any dessert table, and are easy enough for kids to help make.
- Total Time15 minutes
- Yield10–15 1x
Ingredients
- 10–15 large strawberries
- 1/2 cup melted white chocolate chips
- 1/4 cup cream cheese
- Black sesame seeds or black sprinkles
- Red round sprinkles or red icing
Instructions
- Melt the white chocolate chips according to the package directions then measure out ½ cup of the white chocolate chips.
- Add ¼ cup of cream cheese to the white chocolate chips and whisk together.
- Transfer the mixture to a piping bag.
- Cut off the bottom of the strawberry where the stem is then cut each strawberry in the middle.
- Remove the top part of the strawberry and pipe a generous amount of frosting mixture.
- Add the top part of the strawberry back on then pipe more icing on the top of the strawberry “hat”.
Notes
- Work with dry strawberries; even a little moisture can make the filling slide.
- If the filling firms up while you work, warm the piping bag for a few seconds between your hands to soften it again.
- Add the eyes and nose right after piping so they stick easily.
Nutrition
- Serving Size: 1
- Calories: 52 kcal
- Sugar: 5 g
- Sodium: 18 mg
- Fat: 3 g
- Carbohydrates: 6 g
- Fiber: 1 g
- Cholesterol: 5 mg

These Strawberry Santas turned out adorable and tasted great too. I love having an easy Christmas dessert that doesn’t require baking.
Yes, easy, no-bake Christmas desserts like these are perfect during the busy holidays. Thanks so much for sharing!
I followed the recipe exactly and they came together so quickly. This is such a great last-minute Christmas treat idea.
I’m so glad the recipe worked well for you! These really are great when you need a quick and easy Christmas treat.
I made a test batch and now I’m planning to double it for Christmas Day. Such a fun and festive holiday snack.
That always happens here too! They go fast once people spot them.
I made these Strawberry Santas with my kids after school and they were so easy and fun to decorate. This is the perfect no-bake Christmas treat for families.
I love hearing that! Strawberry Santas are one of my favorite no-bake Christmas treats to make with kids. Did they have a favorite part of decorating them?
OMGoodness, these are so cute, and I bet my kids would eat them all in one setting….lol lol I need to make them over the Holiday season, I like that they are so easy to make and even the kids can help.
Haha, that sounds about right 😄 They disappear fast around here too. I hope you have fun making them together!
I brought these to a holiday party and they were the first thing to disappear. Everyone asked for the recipe!
That’s the best compliment — thank you! Strawberry Santas are always such a fun conversation starter at Christmas parties.
These santa hats are so cute and adorable and very easy to make yet look so impressive. I will definitely make these with my neices.
That sounds like so much fun — I love that you’re making them with your nieces.
I used mini chocolate chips for the eyes and they worked perfectly. Love how customizable and forgiving this recipe is.
That’s a great idea! I love how customizable these Strawberry Santas are — little swaps like that make them even more fun.